TOP TIPS: Duck shooting!

Duck shooting tips.
It’s that time of year again when a shooter’s thoughts usually turn to lakes, dykes and estuaries; early morning starts in pursuit of a bird or two to complement the orange sauce. Wildfowling, you really can’t beat it.
Aside from the fact that the quarry is delicious to eat, wildfowling is a world away from driven game shooting.
As always, when you’re in pursuit of live game quality is much more important than quantity, but when you’re after duck or geese you’re usually only looking for ‘one for the pot’ and maybe another one or two for the freezer!
Which is a good job really, because with fowling you might only get the odd shot or two… so every cartridge has to count.
As such, you’ve got to be confident that every time you pull the trigger the outcome will be a cleanly killed bird.
With this frightening reality at the back of our mind, let’s have a look at a few of the typical (if there is such a thing) wildfowling situations that we can mock up on the shooting ground so we can practice for the real thing.
INCOMING PAIR
Unlike clay pigeons, ducks are loyal little blighters and some pair for life (or until one is killed) so one of the more common scenarios you’re likely to encounter is a brace dropping in to water, say, 20 or 30 yards out from your hide.

Now in the proper world – and the birds were real – the trick would be to wait until they’re both fully committed to land before making your move.
Start to raise the gun too early and they’ll be off like the clappers as soon as they see the first sign of movement.
With clays though, it’s considerably easier, as the birds definitely won’t turn tail and clear off!
The technique here, though, is to make sure you always take the bird that’s going to disappear from view – i.e hit the ground – first.
Take the higher target first and you’ll probably find yourself rushing to get down onto the second.
The swing will be non-existent and you’ll find yourself stabbing at the target, almost in desperation and you’ll almost certainly result in a miss behind the bird.
Make sure you keep your face firmly planted on the stock – don’t lift your head to see where the other bird is – and keep the swing going in one smooth, unhurried movement.
DROP IN, CLEAR OFF
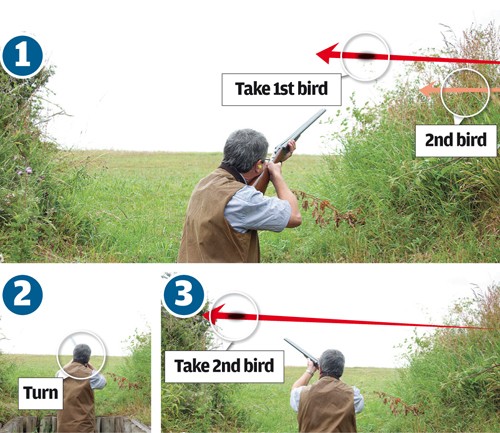
As we’ve just mentioned, always take the lower bird of a live pair first, but what would happen when the second bird hears the shot and zooms off?
Again, this can be replicated on the clay ground simply by having the second target as a crosser on report.

Try to adopt a stance that means you don’t have to move your feet to be on the second target.
In this way, after you’ve killed the first bird, keep the gun ‘up’ in the shoulder pocket and then swing up, onto, and ahead of the crossing bird in one smooth movement.
If you find you struggle with fast crossing targets you could do a lot worse than having a few rounds of skeet – it will certainly sharpen your reflexes – and help build the library of sight pictures you’ll need for assessing fast-moving crossing targets.
DOUBLE CROSS
So we come to another typical scenario, and one that can be mocked up on a sporting layout with ease, and that’s a pair where one bird is trailing behind the other.
This should result in a classic crossing left and right.

This pair has got to be taken at speed and I prefer to take the trailing bird first and then follow through onto the second, rather than having to stop my swing and wait for the second target to catch up.
Choose your visual pick up and kill points with care, and ensure you get your swing going and the muzzles on the flight line as quickly as you can – if you don’t the second bird might well be un-hittable by the time you’re ready to let rip with the second barrel.
Pull ahead of the bird, keep the swing going and fire. Target smashed, hopefully.
Keep the muzzles moving at the same pace and pull ahead of the second target.
Gently squeeze the trigger – it’s most important that you keep the muzzles moving as you fire – and that should be another tick on the scorecard
SIM PAIR, OVERHEAD
In real life birds sometimes won’t come in to your decoys and they’ll simply carry on flying away off into the distance, oblivious to the fact that you’re desperate for something for your supper.

As both birds will be travelling at the same velocity and height take whichever bird you feel is best first. (Right-handed shooters generally opt for the right-hand bird, but it’s a personal thing.)
Tilt your head to look back and get an early view of the targets as they approach. No matter how close together the birds are, don’t be misled/tempted to try and kill them both with one shot.
You’ll almost certainly end up firing between the two and missing.
Transfer your weight from the back foot to your front during your swing and lock onto your chosen bird. Keep the swing going, pull the muzzles in front of the bird and pull the trigger.
If possible, try and keep the same rate of swing going then simply pull/push the muzzles around onto, and then in front of, the second bird.
Squeeze the trigger and that’s another couple of kills recorded on your score sheet.
INCOMER FROM BEHIND
This is a tricky little target that simulates a bird coming over and in from behind before dropping into the lake in front of you.
We have a choice.
Either take the bird while it’s still under power and above you, or wait until gravity takes effect and it starts to drop.

The latter scenario might seem easier because the bird is travelling considerably slower.
However, in my experience, I’d always prefer to break the target when it was still under power.
It’s much less likely to be affected by the wind and will generally fly straighter and truer.
Swing the muzzles ahead of the bird and simply pull the trigger.
All you’ve got to do is arrange a collision between the shot and the clay so keep it simple.
If you are tempted to have a go at the clay when it’s not under power and dropping, my only advice is give it a lot more lead than you think it needs – double probably.
When these birds drop, they drop like a stone!
TEAL TARGETS
Fire a shotgun anywhere around a pond and it’s pretty much a sure fire bet that every bird that’s feeding there will up sticks and clear off until things settle down again.
The result is often fast, rising, going away birds.
In effect, teal-type targets.

If possible, and if you’ve got the time, it might be wise to shoot ‘gun up.’
Otherwise, bring the gun to the shoulder, keeping your face on the stock and the swing smooth.
When the target is resting on the bead on the barrel – making sure you don’t stop the swing – pull the trigger.b
TIPS
lf you’re shooting over water, try to avoid shooting at, or even near, the horizontal.
Lead shot can skim on the water’s surface in just the same way that stones do when they’re thrown, increasing their range dramatically.
What was a nice safe shot at 40 yards under normal conditions could easily be dangerous at maybe 70 or even 80 yards over water.
On the foreshore or over big lakes this might never be a problem, but on a small flight pond it could be dangerous.


