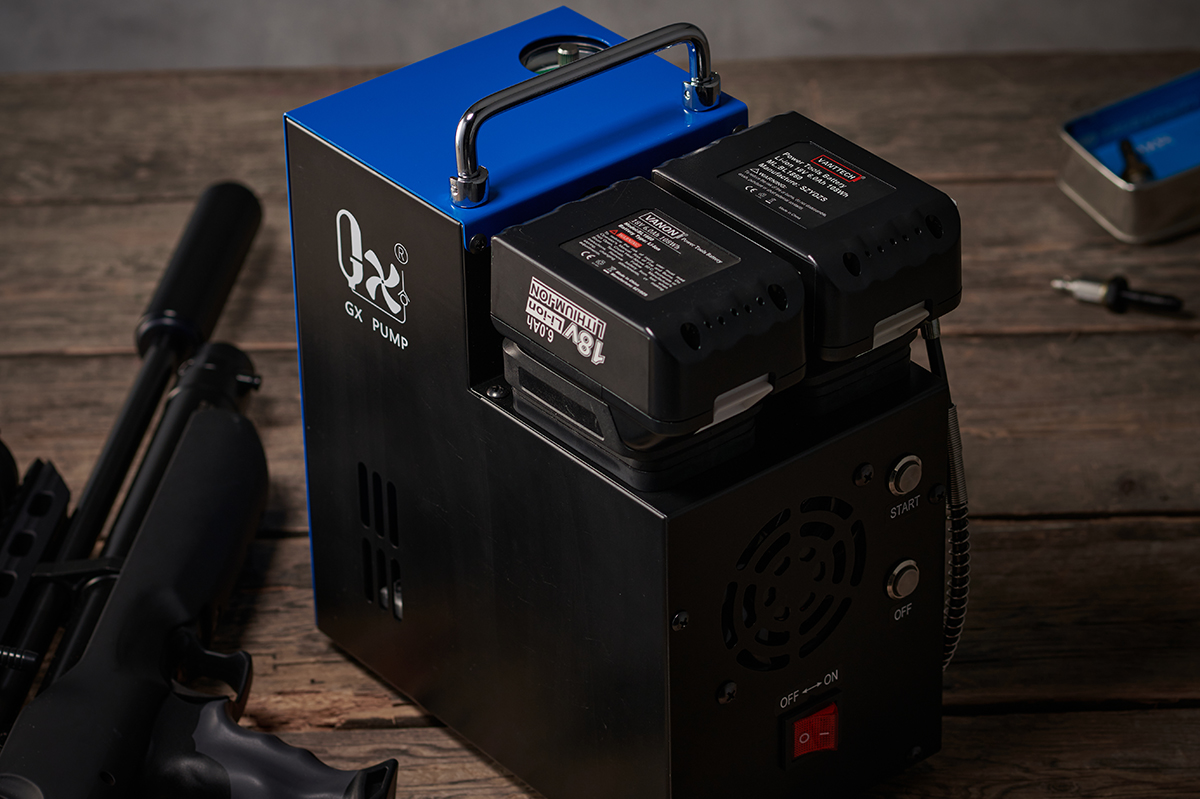
GX-L3 airgun compressor
Mike Morton delivers his verdict on the GX-L3, a self-sufficient compressor that’s light enough to be taken shooting and doesn‘t need to be plugged in

GX-L3 airgun compressor
Price as reviewed: £500
While many of us started out with a springer, the PCP is now the dominant airgun powerplant, with its on-board air reservoir offering maximum ease of use and minimum physical effort. There is a downside though, and that’s the fact that the compressed air that propels the pellet has to come from somewhere. That typically means a stirrup pump or scuba-style charging cylinder. But there is a third way in the shape of a personal air compressor like the GX-L3 from Gilbert Distribution.
Why would you want one of these? Let’s first look at the alternatives. A stirrup pump is a great way to fill a pre-charged pneumatic, relatively inexpensive and portable, but you need to be reasonably fit to operate one. A dive-type cylinder offers ease of use when it comes to filling, but when the pressure drops it will need to be taken to a dive centre or gun shop to be refilled.
And because they’re usually made of steel here in Europe, they are heavy, especially those of a greater capacity such as seven or 12 litres.
A personal air compressor, on the other hand, combines the convenience of a dive cylinder with the self-sufficiency of a stirrup pump, and the GX-L3 offers another hugely useful feature to its owner– it’s light enough to be taken with you when you go shooting, and because it runs off batteries it doesn’t need to be plugged into the mains in the wall or vehicle socket.

The fill line is quite short, so make sure the rifle is properly supported with something like a bean bag or bipod before coupling it to the compressor
The L3 takes Makita-style batteries, a common type that’s in use in everything from cordless DIY tools to garden appliances, pressure washers and leaf blowers.
The L3 can take either one or two of these batteries. Installing two will not speed up the time it takes to fill a PCP – and a slow, steady fill rate is always better in any case – but it will extend the number of fills that the L3 can deliver before the batteries need to be recharged.
Due to the widespread popularity of these batteries, Gilbert Distribution recognises that some shooters will probbaly already own one or more, as well as a battery charger, and has sensibly drawn up various pricing options for just the compressor on its own, or for the compressor, batteries and charger.
If you’re looking for more airgun compressors, read our list of the best compressors for air guns here.
GX-L3 airgun compressor – key specification
Manufacturer: GX
Model: L3
Distributor: Gilbert Distribution (omegacompressor.com)
Battery type: Makita-style lithium
Fill hose: Quick-detach Foster female fitting
L3 compressor only: £440
L3 and one battery: £460
L3 and two batteries: £480
L3, two batteries and charger: £499.99
Shipping/delivery for most of GB: £16
Setting up the GX-L3 airgun compressor
The L3 that was sent to me for review came with two batteries and a charger, and the first order of business was to ensure both were fully charged before I started to use the machine.
For safety reasons the batteries are only charged to 40% when they leave the factory. The supplied charger takes one battery at a time, and you know you’ve slotted in the battery correctly because it will play the first few bars of Mozart’s Eine Kleine Nachtmusik (!) and the light will go solid red.
The charger is quite a useful little device as it tells you exactly what’s happening and when.

The L3 is a truly portable unit, as it only weighs around 9kg with one battery installed and is self-contained with no cables to worry about
A sustained red light means the battery is charging anywhere from 0% to 80%, while a red and green light appearing together means the battery is between 80% and 100%, and a sustained green light means charging is complete.
Other lighting modes will tell you if the battery is too hot to be charged and whether the battery or charger are defective. It took around 30 minutes to charge each of the two batteries out of the box, and there was another musical reminder that charging was complete.
One really great feature the machine offers is the ability to pre-set the desired fill pressure, which can be anything up to 310 bar.
When the device reaches the set pressure it will automatically stop filling. This is set simply by turning a dial on the pressure gauge at the top of the machine. The circular scale is graduated in psi on the outside and bar on the inside, and being British I’d have preferred it the other way round, but it’s fairly easy to read regardless.
The brass pointer is quite large, so I’d err on the side of caution and set the pointer to underfill slightly until you get used to where to set it to get the exact fill pressure you’re after.
And if you have two or more PCPs that require different fill pressures, then I’d suggest filling to the desired pressure for the gun with the higher pressure, then adjusting the dial back down to the level of the gun with the lower pressure. That way, if you forget to reset the dial before filling, you’ll only ever underfill your gun, rather than overfill.

The charger will display a solid green light when the battery has reached full capacity, and an audible alarm will go off as well
The fill hose on the L3 can be hung from the side of the machine out of the way when it’s not being used, which is a nice, tidy feature. The hose ends in a female Foster connector and comes with a dust plug.
Before the unit is used to actually fill a rifle for the very first time, the manual tells you to test the device to ensure it’s working correctly and nothing has come loose during transit, and for this you’ll need the stopwatch function on your phone.
The recommended procedure is to ensure the dust plug is in place at the end of the hose, set the value of the pressure gauge to 300 bar, open the bleed valve at the back of the machine and then flick the switch at the front. This will activate the cooling fans, but the unit will not start compressing any air just yet.
The next stage is to tighten the bleed valve, press the Start button and see how long it takes to reach 300 bar. It should take between 13 and 18 seconds, after which the compressor will stop automatically, although the fans will continue to run until the On-Off switch has been turned off.
The final check is to wait five minutes to see whether or not the device has held pressure, after which the bleed valve can be opened, which will purge air from the system along with any condensed water vapour. The L3 won’t let any moisture enter your gun as a filter has been installed on the intake.

The L3 has an auto shut-off filling function, so you just need to turn the pointer on the gauge to set your desired fill pressure
Filling up the GX-L3 airgun compressor
The process for filling a PCP rifle or pistol is exactly the same as the test cycle, except this time you’ll need to remove the dust plug and either connect the hose directly to the gun if it has a Foster coupling, or screw the gun’s fill probe onto a male Foster adaptor and click that in place at the end of the hose.
One thing to work out before you start the filling princess is how you’re going to support your gun when it’s been connected.
The fill hose is short, presumably to keep everything as compact as possible when you’re carrying it to the field or range, so you may want to bring along a shooting cushion to lay your rifle on, or else prop it up on a bipod. In use, the compressor works really well. It’s noisy, but that’s to be expected from a mechanical device capable of delivering up to 310 bar, and it won’t be on for very long.

The bleed valve must be closed before filling begins, then unscrewed to release the remaining air in the system before the rifle can be uncoupled
There are two obvious questions prospective buyers will want to ask, to which there are no definite answers, these being how long does it take to fill a gun and how many fills can the L3 do before the battery, or batteries if you have two installed, need recharging?
This will depend on the size of the air reservoir in the PCP and the starting pressure from which you’re refilling it. As a general observation, it took about two to three minutes to fill my guns, although I top them up frequently. A large-capacity buddy bottle that’s already delivered 200-300 shots would take longer.
The L3 is designed to fill guns only, not to refill dive cylinders, and has a restricted duty cycle, which means it should be run for no more than 15 minutes, then rested for 10 minutes before being used again.
The Makita-style battery will run the machine for about 30 minutes, although I didn’t really measure this as I lost count of the number of fills I did and their duration before charging up the batteries again.

The L3 will only start to fill the rifle once the Start button has been pressed, and will stop filling once the desired pressure has been reached
Final Thoughts
One of the main attractions of this unit is the fact that it can be taken with you. It measures 18cm x 25cm x 28cm, and with one battery installed weighs less than 9kg.
It’s not really something that you’d really want to hike into the woods with, but it’s certainly handy enough to throw into the back of the car so you can return for a refill when you’ve been out hunting, taking part in an HFT comp or shooting at the club or range.

With the power switch turned on, the compressor and cooling fans start running, but no filling will take place just yet
The unit also has a comfortable carrying handle that folds down out of the way when it’s not in use.
While I would have preferred to have had a slightly clearer dial and a thinner needle to set the pressure, I have otherwise only good things to say about the GX-L3. It’s worked flawlessly for me during the three months that I’ve been using it, and it’s brilliant to be able to just set a fill pressure and let the machine do the hard work for you, rather than having to hang over the end of a dive cylinder like a hawk, poised to turn off the air supply before the needle creeps too high.
It’s a lot lighter than my 12 litre dive cylinder and is smaller too. And I don’t miss for one minute having to drive 45 minutes to my “local” dive centre to get a 300 bar fill.
Verdict
The GX-L3 is a small, self-contained compressor that can be used out in the wilds as well as in the comfort of your home, with the icing on the cake being fuss-free filling thanks to the auto shut-off feature


