10 ways to be better at grouse shooting
Just one of these tips could improve your grouse shooting no end

10 ways to be better at grouse shooting – by Adam Calvert
1. Practice
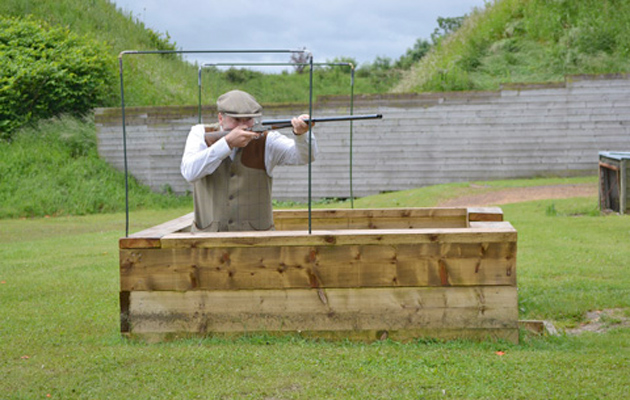
If you want to be better at grouse shooting, you need to put in the practice. It will pay dividends to make the time to warm up at a reputable shooting school with an instructor who has grouse experience. You should be able to practise birds coming in front and going behind with the use of safety sticks. Something often forgotten is that 40 per cent of grouse will be shot out of the back of the butt.
2. Gunfit
Ensure your gun is correctly fitted. Good grouse shooting relies on fast, instinctive grouse shooting and for this poor gunfit and gun mount are totally unforgiving. In these circumstances, whether your gun costs £50 or £50,000, if it does not shoot where you are looking, it is useless!
3. Safety
When you arrive in your butt, quickly get yourself settled and set your safety sticks: this is your responsibility, not your loader’s, although if in doubt do seek advice from your loader. Practise turning and grouse shooting at going away birds, keeping in mind that your sticks only work if you stay in the same position after you’ve set them (step to the back of the butt and they become useless). Make sure that everyone is in position – including pickers-up – before you start grouse shooting.
You must also be mindful when shooting at grouse coming the wrong way through the line (which are occasionally put up by pickers-up moving into position) – your sticks will not be set correctly for these birds.
Next, you must check for flankers, especially if you are gun 1, 2, 8 or 9. And remember it is not uncommon for guns drawn closer to the centre of the line to be a danger to flankers, particularly as the flank line can move throughout the drive. A wave of a hand to acknowledge them will go a long way to put them at ease. Remember, dangerous grouse shooting is your own fault and nobody else’s.
4. Keep still…
… And wear appropriate clothing; dark colours are best, and no bright shirts. Remember grouse are wild birds, so it’s very important you and your loader stay still, especially when the butts are raised out of the floor or are on the skyline.
5. Keep the barrels low
Following on from point four, you must ensure you keep the gun barrels pointing low, just above the heather. This has two effects: firstly, there is no excessive movement of the gun barrels, thus alerting the grouse; but more importantly, doing so means it is much easier to bring the barrels onto a target from below than from above.
6. Shoot early to avoid disappointment
Make sure you are aware of your distance as you need to be attacking the grouse early; if in doubt, agree a point with your loader or pace out 60 yards in front of the butt before the drive starts. Engage the grouse just on the opposite side of this marker. Trust me, once they break the 30 yard point they will travel from there to you in what seems like a split second! Be confident. This is where a couple of hours with a good instructor will stand you in good stead. We are looking to fire all four shots if we can, at least two in front and two behind.
7. Gun mount
In order to be successful on the grouse moor, a smooth and accurate gun mount is necessary: lead with the front hand, ensure the gun hits your cheek first and bend from the hips to ensure the gun locks into the shoulder pocket correctly.
8. Pick a bird
You can use two methods. Firstly, pick a bird out of the pack that appeals and then stick with it. Alternatively, a method I am using more and more – ideal when you have good mount and gunfit – is to mount the gun into the middle of the pack: you will be amazed to see a bird suddenly appear. The fact you are looking at the bird means your gun is automatically pointing at it; now squeeze the trigger instantly.
With either method, it is absolutely essential that you keep looking at the bird until it falls. I see so many grouse missed due to rushing the first shot and starting to move away to the second shot. Therefore make sure the bird falls before you leave it. Remember your target should be one gun one bird; my motto is “two shots fired, one dead bird; anything better than this is a bonus”. Avoid firing into the pack as it just does not work, and at best you will end up with a wounded bird.
9. Footwork
Good footwork is vital to give you the best chance of killing a bird, particularly with crossers and birds going behind. You have a narrow window both in front and behind, which is not unlike a grouse shooting cage, so economy of movement is vital. I often position myself next to my sticks to help on fast incoming birds going between butts. By standing right next to your safety stick you will prevent yourself from coming ‘round’ your sticks and rolling a shot into your neighbour. This actually leads to a greater feeling of confidence as you know the shot is safe.
10. Shooting behind
Picking your target is essential. Set your footwork quickly depending on which side you are going to shoot the grouse. Make sure you keep to the front of the butt so your safety sticks will help keep you safe. Try to avoid stepping to the back of the butt.
Do not take your eyes off the bird, but watch it through the line and then attack the grouse and shoot instinctively as the gun locks into your shoulder. Again, watch the bird fall before moving onto the second. And, above all, enjoy the experience!
Adam Calvert spends a large amount of his time instructing infield with over 55 days on the grouse moors. He is available at: adam@adamcalvert.co.uk; 07785 385275; www.adamcalvert.co.uk


